
Complete
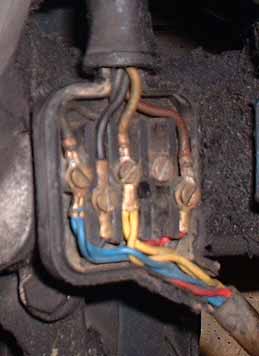
Vespa smallframe engine stripdown and rebuild. Puttin the engine back into the frame is basically a Haynes-Manual-style reversal of the dismantling procedure. You might find this process easier with the scooter laid on its side. If your petrol tank is still in place remove it and lay the bike down, or alternatively jack the bike up, supporting it with a milk crate or by hanging it off the ceiling. It's also a lot easier without the exhaust silencer on the engine (although keep the manifold on there) and without the rear wheel rim. The first thing you need to do is put the swingarm bolt through the frame and swingarm, thereby holding the engine in at the front. Tighten the nut properly if you don't want your engine to fall out when you next ride the scooter. You will probably find now a convenient time to adjust the positioning of the electrical cables, especially if you have an ET3 with wires going into the glovebox. Fix the junction box onto the swingarm and connect the wires to the terminals. Aren't you glad you made notes and labelled everything correctly? If you didn't then basically the wires from the stator connect to the same coloured wire from the body harness. Of course fading can change the colours but you get the idea.
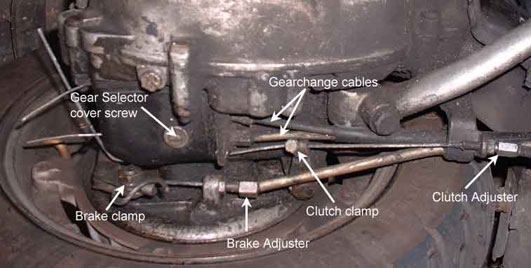
If you have not yet put the exhaust on the cylinder it is far easier to do it now. With the cylinder shroud off the engine bolt the exhaust manifold onto the cylinder using the appropriate gasket. Tourque down the nuts and fasten the cylinder shroud back on. The next thing to do is attach all the control cables to the engine, and let me tell you everything you have just done is child's play compared to this. The clutch and brake cables are easy enough, but the gear cables are awful. You need 3 or 4 hands to do it - so it's handy that there exists something called a 4th hand tool.
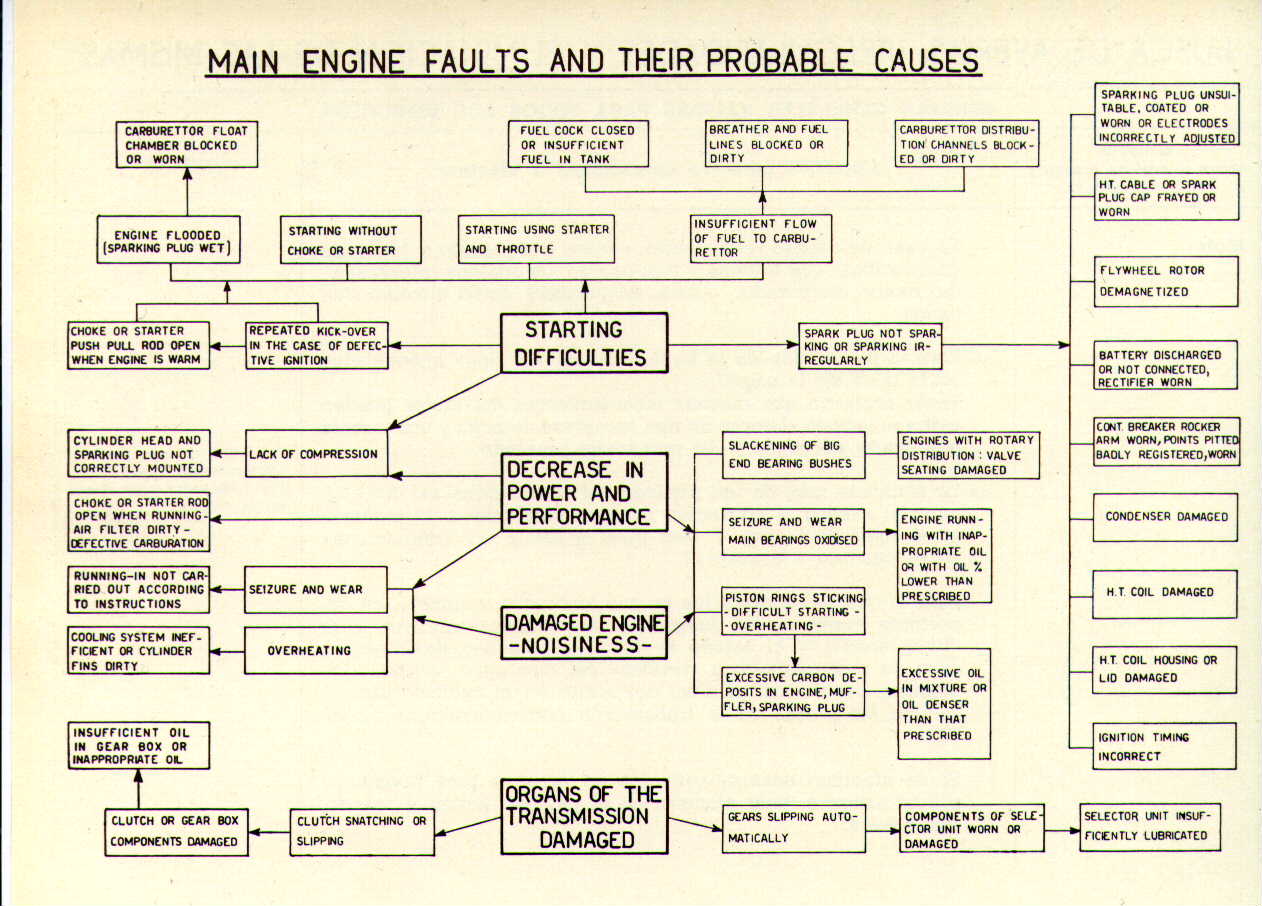
Basically you need to keep a tension on the cable, plus hold the gear shifter on the handlebars in neutral, while holding the selector lever at the gearbox in neutral, and simultaneously holding the little cable clamps tight up against the selector lever - and remember which way round the cables go! At the same time you need to use an 8mm spanner to hold the cable clamp body whilst tightening the screw at the top with a 7mm spanner. Not the best of designs, nor the easiest of jobs. Add to that the fact that gear cables are greased (or should be!) and that will make the clamps slip, so you need to do them damn tight to prevent that. What fun! After you have done that adjust the cable tensioners to take up any slack or loosen too-tight cables. Once everything is connected up and tightened and adjusted turn on the fuel tap, pull the choke out and kick this engine to life. (if it won't kick over check the clutch cable is not too tight, or look at this chart for more clues. Now go for a ride to check everything works, adjusting cables etc as necessary, and stopping off at the off licence on your way home to buy yourself a well earned four-pack of beer. |
Previous - Setting the ignition timing