

|
Complete
Vespa smallframe engine stripdown and rebuild. Once you have your engine completed you need to set the timing. The timing of a cylinder is directly related to the cylinder and its compression. For example if you are using an ET3 cylinder on a 50 special you need to use the timing for an ET3. If you are using a Polini cylinder on anything you need to set it to Polini's recommended timing. Before
we go any further here are the correct timing angles for most
smallframe engines:- There are two basic methods of setting your timing, depending on whether you have points ignition or electronic ignition. Points physically open when they send the spark to the cylinder, so you can use the "cigarette paper method" to time a points engine, but electronic engines can only be timed with a strobe light. Luckily Piaggio recognised that most people do not have a timing strobe light so they marked out the cases, stator and flywheel instead. Let's assume you are setting the stock timing on an ET3. The basic method is as follows. Take the flywheel off and look at the stator plate. you should see a raised mark on the stator plate that lines up with a similar raised mark on the case. Line these up and you have your stoc ET3 timing of 20 degrees before top dead centre (BTDC)
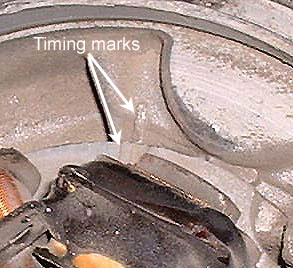
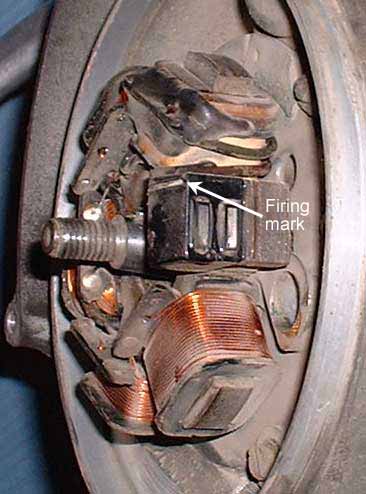
You'll notice that these marks are not perfectly lined up. That's because the production tolerances allow for 2 degrees either way, so if you set the timing with a strobe light you may find you need to move the stator slightly to get it perfect. In all probablility you can leave it at that, but what if you kit the engine and need a new angle? The stock marks are now useless. Here's how to do it properly:- Step 1 - Find top dead centre. You can find top dead centre (that point at which the piston has reached the limit of its travel - it has stopped going up the cylinder but has yet to go down) very accurately with the cylinder head removed and a micrometer secured to the cylinder face, but that's overkill. All you really need to do is put something like a screwdriver in the spark plug hole and, keeping it accurately positioned slowly turn the flywheel clockwise until the screwdriver stops it turning (because it has hit the piston). At this point mark both the flywheel and the engine case with a small dot of white paint and then rotate the flywheel anti-clockwise (keeping the screwdriver very steady) until the screwdriver hits the piston again. Mark this point on the case so it lines up with the mark on the flywheel. Now mark more prominently a point exactly halfway between these two marks on the case. That is top dead centre. Now use a degree wheel (you can buy one or print one off, or use a protractor) to measure the required distance anti-clockwise (the Vespa engine runs clockwise). So 16 degrees BTDC for a Polini top end would be 16 degrees before the TDC mark you made on the case. Mark this point on the case prominently and also mark the flywheel if necessary to make the previous mark you made more visible. The idea is that these two marks will line up at the exact point the spark fires. On an ET3 or other electronic ignition engine you have one more aid before you use the timing light. Remove the rubber bung from the flywheel and you will see two marks by the hole. When these two marks line up exactly with a white line painted on the pickup on the stator the spark is fired.
Remove the flywheel and (using the pre-cast marks as a 20 degree "base" if necessary) rotate the stator (it is loosened by 3 screws) so that this white line will match up with the flywheel marks at the same time as the white paint marks you made on the flywheel and case also line up. now tighten everything up and start the engine. It should run pretty well already if you measured everything right. I'm lazy so that is as far as I bothered to go. It runs and that's enough for me. However to get the timing spot on hire or buy a timing strobe light. these come with a sensor that you clamp on the spark plug lead, or actually connect in between the HT lead and the plug, which tells the light to ignite when the engine sparks. They usually run off 12 volts DC, so you need a handy car or car battery, or an old PC power supply to provide the 12 volts. If all is well with the electronics the White line on the pickup will line up with the 2 marks in the flywheel every time, and if your measuring is accurate your marks will line up as well. Production tolerances being what they are you may well find that they do not line up exactly, in which case stop the engine, remove the flywheel and rotate the stator plate just enough so they will line up next time. Repeat until it's perfect (or you cannot be bothered to adjust it any more - remember 2% either way is OK on a stock engine) For a points engine the procedure is pretty much the same, but instead of the handy white stripe and flywheel marks you need to find the point at which the points open and mark that. Use a cigarette paper (e.g. Rizla or Swan) in between the points and pull it gently. Rotate the flywheel and mark both the flywheel and the case (and the points too if you like) and the point at which the paper is just released. That is when the spark will fire. Piaggio do provide similar help (on "Plastiform" flywheels at least)- there is a small arrowhead cast into the hole in the flywheel which should align with two marks on the stator at this point. Use the strobe light and use these marks as above, rotating the stator if necessary so that both these marks and your white timing marks line up at the same time. Points often need adjusting. For best performance you need to have a points gap of between 0.35mm to 0.45mm on a 50cc with "Plastiform" flywheel or 0.4mm to 0.5mm with a Primavera aluminium flywheel. Note- depending on your accuracy, or that of Piaggio, the "sparking" marks may not line up exactly. This is not important - what is important is that the timing marks you made line up. |
Back to Tech Index
Previous - Rebuilding the clutch