

technical section
Rebuilding the carburettor
How scary does “rebuild your carburettor” sound? Well, fear not — it's a piece of cake — a 3D jigsaw puzzle. You pull it off, take it to bits, clean it, put it back together and put it back on the bike. Sure, it's fairly delicate, but we are not talking eggshell delicate. This article will show you how, and will demystify the whole carburettor thing by explaining exactly what all those bits do to the fuel and air entering the engine. Here we go:
First you need to remove the fuel tank to gain proper access. It's probably possible to leave it in place, but it's easier if it's out of the way. Lift the seat, pull the toolbox out and make sure the fuel tap is closed. Now pull the fuel hose off the carb (there is sometimes a spring clip here, but it's pretty ineffective and redundant anyway). Block the end of the fuel hose with something, or hold it with the open end facing up. Remove the seat post and the 11mm bolts holding the fuel tank on and open the fuel tap just long enough to wiggle the fuel tank out of the frame, then close the fuel tap and set the tank aside. You now have loads of room to get at the carburettor.
To remove the choke, pull the choke knob out, and grab the cable, and unhook it as you push the choke knob back in. To remove the throttle cable, manually lift the throttle arm and unhook the brass cable clamp from its home (red arrow). Remove this clamp (being very careful not to lose it) and you can pull the throttle cable out through the adjuster (green arrow).

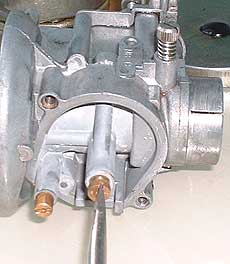
To remove the carburettor use a screwdriver, socket driver or spanner (or all 3 depending on how tough it is to move) on the long hexagonal bolt and shimmy the carb off its manifold.
The complete carburettor (in this case a Dell'Orto SHB 19/19) and air filter assembly looks like this:

The first thing to do is remove the air filter. On some bikes there are a couple of butterfly nuts, on others you'll need a spanner. You'll be left with this:

There are a pair of split pins and some washers holding the air filter together. Remove thenm and you can see the air filter consists of a front panel, a drip tray (and drain hose if it's not been lost) and a chamber containing a few baffles, turns and a bit of wire gauze. Wash everything in petrol and when cleaning the gauze make very sure there are no little bits of wire about to drop off and get sucked into the engine. Those baffles are basically there to keep the intake noise of the engine down by slowing the air down. Put the air filter back together when done and put it to one side. Now we are going to rebuild the carb itself. This carb is a Dell'Orto SHBC 19/19 as fitted to the Primavera ET3, but the following basically hold true for all Dell'Orto scooter carbs.
The SHB has a sliding throttle, as shown in these 2 pictures. When closed it looks like this.

When you tilt the lever (which is all the throttle cable does) the slide moves up, as seen below.

All this does is open the airway up. Air, being sucked through the carb by the engine, passes through this chamber (the Venturi) at high speed, and as it does it drags the fuel mix with it. The slide blocks off this passage, thereby literally throttling the airflow. You should also be able to see how the idle screw, located in the throttle activating arm is a very simple device that physically prevents the throttle slide from closing fully and completely starving the engine or fuel and air. The rate of fuel is controlled by jets. On this type of carb (a constant jet carburettor) the only way of altering the amount of fuel that gets sucked through is by changing the size of the jets. There is a fuel/air mix screw you can see in the bottom of the above picture. This only affects the mix at low revs, and basically controls the size of the opening to the idle jet, thus the effect the passing air has on it, and the amount of fuel it drags through into the airstream. Screw it in and you get the path is closed, causing a leaner mixture, unscrew it and the pathway is opened, so you get a richer mixture. In practice leave it at 2.5 turns out. It will be perfectly fine for most climates. If you do subsequently find it needs adjustment don't go crazy - a half turn to a full turn should cover every eventuality.
Unscrew the throttle assembly and carefully remove the cover. The throttle spring and slide will come with it. Make sure the spring doesn't ping across the room!

You can see there is a brown paper gasket on the underside of the throttle assembly. If it's in bad condition it must be replaced. It's probably a good idea to replace it as a matter of course. One of these comes in every replacement smallframe gasket set. You can also see there is a cork gasket running round the air intake where it meets the air filter. One of these should also be in every gasket kit. Some smaller carbs may use a paper gasket here, but as I don't have one I can't confirm or deny it.
Below you see the throttle spring and slide housing, and the removed throttle assembly. Clean it all out with petrol. You can also see the choke cable here. All engaging the choke does is open a path from the venturi to the starter jet so extra fuel is drawn into the airstream, making the resulting air/fuel mix is a lot richer (i.e. rich in fuel). As long as everything is working OK this fuel rich condition is only required by a cold start, and your Vespa will flood and run like a lame snail if the choke is engaged under other running conditions.

Now, back to the overhaul. The incoming fuel mix passes through a filter. Unscrew it.

Clean these parts with petrol. When you come to put them back it will be easier to get the fuel line on if you rotate the attachment clockwise a bit from the recommended vertical position.

Now for our first carburettor jet. In the picture below the screwdriver is in the idle jet (aka the minimum jet). This jet controls the amount of fuel available when the engine is at very low speed. It should always be screwed fully in. Except for now, cos we are removing it to clean it out. Unscrew it, being careful not to lose it or damage it.

Jets are delicate, so don't drop any housebricks on them. Here's the removed idle jet.

The important part is a tiny passage drilled through them through which fuel passes. The bore (width) of this hole meters the flow of fuel. The hole can be cleared out with a small-bore drinking straw and a sharp puff of air, or in extreme (for which read “don't even think about it!”) cases a very thin wire. Absolutely the best method, however, is an aerosol can of compressed air. You can buy these at computer shops for cleaning keyboards and the like. Just blow air through, making sure you hold tight and don't blow the jet across the room. The jet and its passage need to be completely clean.
Once it's clean, replace the starter jet and we'll move onto the main and idle jets. Start by removing the float bowl by undoing the two bolts as in the picture below.

You'll see the following once the float bowl is removed.

The large white doughnut is the float which, as you would expect, floats. Be very careful with this as it is imperative that it remains intact — after all it cannot float if there are holes in it. The brass screw in the centre is the main jet, and in the corner is the starter jet. The main jet meters the fuel available when the engine is running normally, and the starter jet meters the fuel when the choke is engaged.
Now we need to very carefully remove the float. It pivots on a pin, which you should remove by pushing it through the holes it sits in.

Be careful removing the float, because loosely attached to it is the float needle.

This needle controls the amount of fuel admitted into the float bowl (and therefore available to the jets) in conjunction with the float. As the fuel level in the float bowl rises the float rises and the needle closes off the fuel intake, opening again as the fuel level falls. This prevents the carburettor from flooding, so it is imperative that both the float and needle are in perfect condition. Treat them very carefully. Check the float for holes by immersing it (preferably in petrol, but water will do as long as you clean and dry it off thoroughly afterwards).
Remove the main jet by unscrewing it as shown below.
It should look like this.

Now remove the starter jet...

...which looks like this:

Clean both of these using compressed air as you did with the idle jet.
Clean the float chamber, the float and the needle and blow air through all the passages in the carb to make sure there is no debris in there. Replace the jets by screwing them fully into their respective holes. To replace the float and needle you need to slide the needle into the slot on the float:

and carefully replace the float and needle in their homes. Slide the pin back into the hinge.
Now replace the float bowl, the throttle assembly and the fuel intake and filter if you have not already done so. Hey presto, one rebuilt carburettor. Note in the picture below I have rotated the fuel intake nozzle just past the indent. This moves it off the vertical and makes it easier to remove and re-attach the fuel line in future.

Reattach the air filter using the hex or butterfly nuts and put the carb back on the bike. Refitting is the reverse of removal, as Mr Haynes would say: tighten the collar over the carb and manifold, hook up the choke cable. and feed the throttle cable through the adjuster (green arrow). Take this opportunity to screw the adjuster almost, but not completely, in and put the the brass clamp on the throttle cable. pull the throttle cable tight and slide the clamp up to its socket on the throttle arm (red arrow).
You need to unhook the cable again to tighten the clamp up. Note the correct position, so you can hold the clamp there when you remove the cable from the throttle arm and tighten up the screw to hold the clamp in that position. Slip it back onto the throttle arm and if necessary use the adjuster to allow the throttle arm to close completely (that is, until the idle screw prevents it closing further) and there is minimal (preferably no) play in the cable before it activates the throttle arm.